
Table of Contents
The initial stages of evaluating a site for search engine optimization (SEO) are often overwhelming – especially when the site you’re evaluating seemingly has every issue under the sun.
To sort through the confusion, I’ve come up with one simple rule: if Google offers a special tool that helps you measure something, it’s probably worth prioritizing whatever that tool is measuring. That means mobile-friendliness, structured data, and page speed should always be high on your list.
Now that you have a simple rule for prioritizing tasks, my aim is to provide you with a straightforward guide on quickly and effectively improving your Google PageSpeed Insights score. To keep the scope narrow, I chose to focus on solutions for WordPress sites (although some of these solutions depend on server type, so they’re not totally exclusive to sites built on WordPress).
Before we dive into the solutions, I want to provide some background on page speed and how it relates to SEO as well as PageSpeed Insights itself.
First, why has page speed become so important for search engine optimization? The answer is twofold: user experience (UX) and the rise of mobile search. It’s becoming more and more difficult to distinguish between what is good/bad for UX versus what is good/bad for SEO – the two are nearly inseparable.
So, you might be saying, “Okay, I get it. Page speed is obviously a key component of user experience.” But why has it, in the eyes of many SEOs, become one of the key components of SEO?
One possible answer is this: As Google revealed in 2015, a majority of their searches take place on a mobile device. Obviously, a significant portion of searches on mobile devices happen on mobile networks. These mobile networks notoriously have a lower bandwidth than Wi-Fi or wired connections do, which means site owners need to make sure their site is optimized for all levels of internet connection speeds. This places a greater emphasis on page speed.
If you’ve ever used PageSpeed Insights, you know that there are quite a few things that can influence how quickly a page loads. A site might load slowly because the server it’s hosted on is taking too long to respond to an HTTP request. Or, a site might load slowly because it has one of those ungodly image- and JavaScript-heavy sliders.
The Core Four
To create the best combination of simplicity and impact (think bang for your buck), I boiled the list of Google’s 10 “Speed Rules” down to 4 “musts”: Enable Compression, Leverage Browser Caching, Optimize Images, and Remove Render-Blocking JavaScript.
To the code-averse, some or all of these fixes might be intimidating, but hopefully after reading this guide, you’ll be confident enough to tackle these issues on your own.
Enable Compression
GZIP compression is exactly what it sounds like; it’s a way of shrinking the size of the files that make up a web page. Enabling GZIP compression is one of the least complicated fixes in this guide. All you need is access to your .htaccess file and the code below.
There are two ways to access your .htaccess file on WordPress. The easiest way is via the Yoast plugin (assuming you use it, which you should). The other way is through FTP or cPanel access.
To find the .htaccess file through Yoast, go to the plugin in the admin menu, then navigate to the ‘Tools’ menu and select ‘File editor’ (second bullet point). You should see the Robots.txt file at the top of your screen and right below it, the .htaccess file. On a new line, paste the following code:
After saving your changes, check whether GZIP compression is enabled with Varvy’s GZIP compression tool. If this code does not work, try one of the following depending on the server type you’re dealing with. To identify server type, use the BuiltWith extension for Chrome or the BuiltWith website.
For Apache Servers
For NGINX servers
Note: This code would go in the config file, not .htaccess.
Note: Accessing the .htaccess file via FTP is dependent on your host. Please contact them or find their documentation for assistance.
Leverage Browser Caching
The concept of browser caching is relatively simple. It’s a way of making repeat visits to a website load more quickly by having a visitor’s browser temporarily store files like CSS stylesheets, images, and JavaScript files so they don’t have to re-download them on each visit.
Like enabling GZIP compression, all that is required for leveraging browser caching is accessing your site’s .htaccess file and adding a little bit of code. If you’re not sure or don’t remember how to access your .htaccess file, please reference the previous section.
Once you’re in the .htaccess file, paste the following code on a new line:
Double-check whether adding this code worked by running a PageSpeed Insights test.
Note: “Leverage browser caching” may still get flagged if any assets are pointing to an external domain that does not have browser caching enabled. Just expand the dropdown for ‘Leverage browser caching’ and make sure there are no links from your domain listed.
In case you’re curious about exactly what this code is doing, let’s break down what is happening with this line:
ExpiresByType text/css "access 1 month"
Here, the server is saying, “Hey, this website’s CSS file is probably not going to change for at least one month, so instead of having to come back and re-download it every time between now and a month from now, why don’t you just store the file on your computer. That way the site will load much faster in the meantime.”
Check out Varvy’s excellent write up on browser caching to learn more, including alternate methods of caching.
Optimizing Images
Images are often the “heaviest” elements on a web page in terms of file size. For reference, a typical CSS stylesheet might fall just below 100KB in file size while one image with dimensions of 1000×1000 can easily reach 1MB – about ten times the size of a CSS stylesheet. And, if your web page has multiple images on it, the impact on page speed can quickly become significant.
Since images are often an essential part of communicating your message, removing them entirely to improve page speed usually isn’t an option. There are, however, a couple of approaches that you can take to minimize the file size of your images without sacrificing your message:
Use the Smallest Dimensions Possible
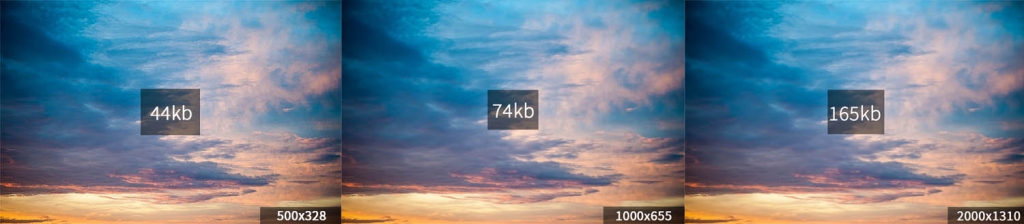
The images above show the file size for the same image at three different widths: 500px, 1000px, and 2000px, respectively. As you can see, loading an image that has a width of 2000px but only needs to be displayed at 500px wide can result in nearly quadrupling the file size.
In many instances, people will upload the full-size version of the image to their CMS, only to scale it down with CSS when adding it to a page. While there are plenty of legitimate use cases for this method, it should only be used if you have a good reason for offering users both a scaled down version of the image and the full-size version. This is because browsers load the full-size image and only scale it down once they come across a CSS rule that tells them to.
So, for example, let’s say you have an image that is 800×800 in its natural state but is displayed at half the size (400×400) when it’s rendered on the web page. If there is no reason to make this image available at its full 800×800 size to users, then scale the image down in WordPress’s Media Library to 400×400.
Bonus tip: File format can also be a factor. For instance, JPEGs are typically much smaller files than PNGs.
Compress the Image Files
We’ve already covered GZIP compression which is a way to compress an entire web page, but compression also works for individual files and is especially useful for large image files. Much like implementing GZIP compression, image compression is relatively straightforward.
Here are a couple of different ways to compress your images:
- Smush Image Compression and Optimization (a.k.a. WP Smush) – This easy-to-use WordPress plugin allows you to go through your media library and compress images that have already been uploaded. It will also compress images as you upload them.
- Other tools – There are a host of other software programs and websites that offer image compression. One of my favorites is Compressor.io.
Note: If you go back and compress the images in the previous section, you’re left with file sizes of 20kb, 52kb, and 123kb, respectively. That’s making the images anywhere from around 25% to over 50% smaller.
Remove render-blocking JavaScript
To round out this guide, I saved the most technically advanced for last. Fair warning for the code-averse, this one might require dealing with some PHP. But don’t worry, it’ll mostly be copy and pasting.
Before getting into solutions, it’s important that I explain exactly what “remove render-blocking JavaScript” means.
In a broad sense, when a browser loads a web page it reads the source code in the order it encounters it, interprets it in that same order, then renders what it interprets onto your screen. This means, when browsers encounter links to JavaScript files, they must follow the links and read them before they can render the rest of the code on the page.
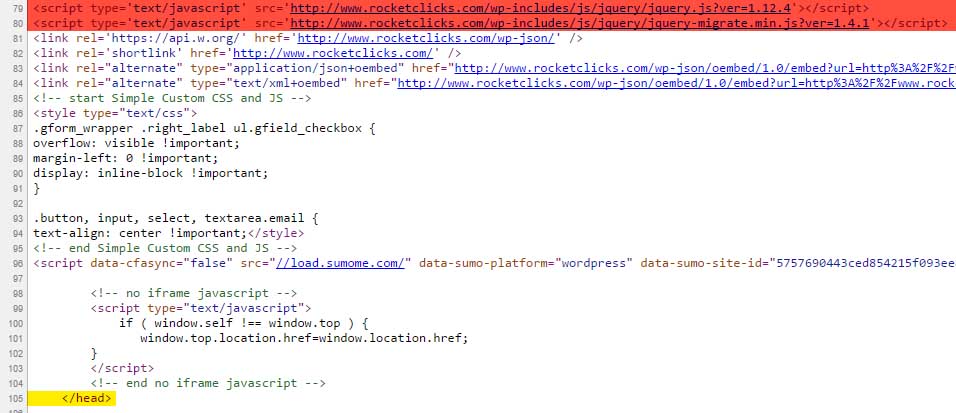
In the example above, the JavaScript files are inside the closing head tag (</head>). This is not ideal as most of a page’s actual content usually comes after the closing head tag.
In most cases, JavaScript is not essential for displaying the web page (JavaScript is mostly used to make a site interactive). So, if the head section of your web page’s source code makes several calls to JavaScript files, the browser must follow those before it can render any of the content that is further down in the source code.
This is why it’s called render-blocking JavaScript – it prevents the user from actually seeing the content right away. If you want to read a more detailed explanation, you can find one here.
Now, there are a couple of different approaches you can take to defer the loading of JavaScript so that it doesn’t block the rendering of the page.
One way is to add a little bit of PHP code to your WordPress theme’s functions.php file. Another way is to download a plugin that will take care of it for you.
I will explain how to handle both fixes, but I prefer the former because it’s quicker and helps you avoid plugin clutter.
Option 1: Editing Your functions.php File (WordPress Only)
Again, this might seem scary to the code-averse, but as long as you follow these instructions and don’t mess with anything in the functions.php file, you should be fine.
Note: If you do not have access to the backend of the site via FTP, you should steer clear of this option. Even a single typo can take make the whole site inaccessible.
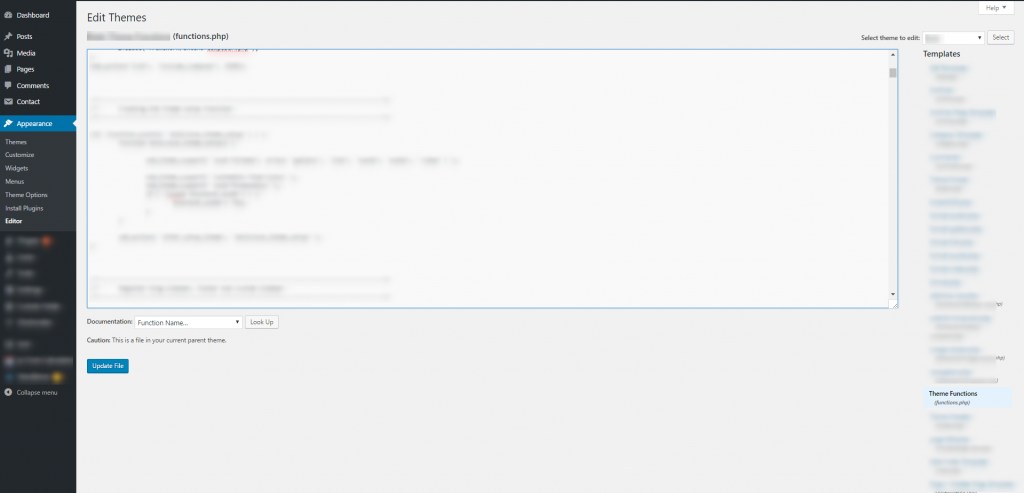
Step 1: Navigate to the Editor (under Appearance) in the Admin menu (see above screenshot).
Step 2: Find ‘Theme Functions’ in the list of PHP files on the right-hand side (see above screenshot).
Step 3: Scroll to the very bottom of the functions.php file and paste this bit of code (make sure you’re not pasting inside of another function):
From the top down, what this code is saying in the most general sense is, “Whenever the user is anyone except for the admin, defer parsing of JavaScript.” The “except for the admin” part is important because deferring JavaScript for users in the backend could force some plugins not to function properly.
In cases where you don’t want every single JavaScript file deferred, you can specify which ones should stay where they are by adding the following between the third and fourth lines of the code above.
if ( strpos( $url, 'NAME_OF_FILE.js' ) ) return $url;
NAME_OF_FILE should be replaced with a unique string of characters leading up to the .js file extension. For example, if you have two JavaScript files in two separate folders that end in “jquery.js”, but you only want to specify one of them, expand the string you’re searching for so that it’s unique from the other.
If you’re trying to target two or more files with this code, format it the following way:
if ( strpos( $url, 'EXAMPLE1.js' ) || strpos( $url, 'EXAMPLE2.js' ) ) return $url;
The highlighted part is what you need to add for each additional file you wish to specify. If you’re not familiar, the || is an OR separator for PHP, allowing you to specify multiple conditions.
Option 2: Download a Plugin
Follow this link to Hostinger for insight on which plugins to work best. Again, this is a relatively simple issue that shouldn’t require downloading a whole new plugin, but this is a good fallback if the functions.php file is not cooperating or if you’re extremely code-averse.
Conclusion
It’s nearly impossible to get a perfect PageSpeed Insights score, but tackling these four easily fixable issues will get you much closer. More importantly, it will lead to noticeable improvements in the actual loading times of your site.
User experience is inextricably linked to SEO, and if you’re not addressing important factors of user experience like page speed, then you’re behind the curve from an SEO perspective as well.
Finally, one more shout out to Varvy for teaching me virtually everything in this guide. Head over to the page speed section of their website for more learning.


I want to share my 2017 year experience in Google Pagespeed images optimization for my website:
I have tried free version of WP Smush, but Google Pagespeed still had issues to my images. Then I read that in September 2017 Google Pagespeed changed the rules of the game, and now it wants all images to be smaller then webp q75 + 10%. I tried to achieve that with MozJpeg encoder, but resulting images had terrible artifacts.
So as I understand there is no way now to achieve high score in Google Pagespeed, except using webp images. I used free plugin Opti MozJpeg Guetzli WebP to create webp duplicates for each image in my media library. Now I have two files for each thumbnail (original and webp). If browser supports webp, it gets webp duplicate, If not – original image. It is achieved by the following code in .htaccess
<IfModule mod_rewrite.c>
RewriteEngine On
RewriteCond %{HTTP_ACCEPT} image/webp
RewriteCond %{REQUEST_URI} .*(jpe?g|png|gif)$
RewriteCond %{DOCUMENT_ROOT}/$1.webp -f
RewriteRule (.*) $1.webp [T=image/webp,E=accept:1]
</IfModule>
<IfModule mod_headers.c>
Header append Vary Accept env=REDIRECT_accept
</IfModule>
AddType image/webp .webp